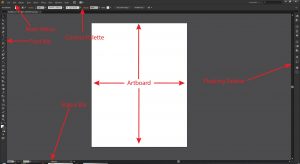
This is second class of Adobe Illustrator Tutorial. In previous class we learned to create a new document and its options that appears in a dialogue box. In this tutorial we will talk about interface of the software and some tools of the software. Following is the screenshot of Adobe Illustrator CS6 interface.

After watching above picture one can easily understand the interface of Adobe Illustrator. Even though I am trying to tell more about it. In above image first of all, like every application/software it is Main Menu. Main Menu is appears as a row of options in a title bar. it contains basic and main options of software.
After that there is Toolbox or Tool bar. In tool bar there are various tools for selection, drawing, cutting & coloring. We will learn them in detail later.
Control Palette
Control Palette is a place which shows option related to specific tool. When we select any tool from tool bar it shows more options related to that tool in a control palette for making adjustment.
Artboard
Artboard is a working area in which we work. We can add multiple artboards in a single document and change their size as per our requirements, and their arrangement as well. Furthermore you can open multiple illustrator documents at the same time. Any design that will create outside artboard will not be visible in our final output (JPEG, PNG, GIF etc).
Floating Palette
Floating Palette is a list of options that can also be accessed from Main Menu. These options are Color, Gradients, Alignment, Brushes, Symbols, Stroke, Appearance, Layers etc. We will discuss them later in detail.
Status bar
Status bar shows percentage of preview at which you are currently you are watching your artboard, and artboard number at which you are currently working.
In Next tutorial will will learn to use some tools of the software.
Thank you for your time. If you have any questions, feel free to ask. We will cover more as long as we move ahead in this series of Adobe Illustrator Tutorial.
 Technowatchpk.com | Hub of Tutorials, Software Reviews, Mobilephone News


